Grain-free meatballs

16 Mar

Our spring has turned very unspring-like this week, with a few inches of snow and colder weather returning to remind us that we live in Minnesota. So what can one do but make hearty comfort food?

Hey, I’m fully on board with that.

We’ve been trying to stay away from wheat, which really does a number on my system. So I decided to try making meatballs without breadcrumbs. I also tried to make it as vegetable heavy as I could. Voila! It’s our new favorite dish to add to any sort of good meal. These meatballs stand on their own as a protein for any meal but really are quite delicious with a simple tomato sauce over whole wheat noodles or, in my case, spaghetti squash, for a fully wheat-free dinner.

I use half ground turkey and half ground beef. I’ve been meaning to experiment with adding in some spicy sausage as well. Maybe next time.

Finely chop some onion, garlic, parsley and mushrooms. Make sure the mushrooms get chopped very well.

I think the mushrooms really make the dish. They add quite a bit of moisture to the meatballs and keep them from being too heavy or dense.

Mix everything together and add the seasoning of your choice.
I always add Arisco, my favorite Brazilian seasoning, to everything. It’s perfect in here for seasoning the meat. But you can always just use salt and pepper or steak seasoning or even a good Italian seasoning. You get to make the choice on what flavor you prefer.

Don’t be afraid to get your hands in there…it’s easier to form the meatballs by hand anyway.

Line a couple of baking sheets with foil, then form golf ball-sized meatballs and plop the meatballs on the foil-lined pans.

You could make them really tiny to serve at a party. Or maybe you just like tiny food. There’s no judgement here! Just make sure you adjust the baking time.

Put the pans into a preheated 425°F/220°C oven for 20-30 minutes. You’ll notice that they release some liquid. No worries…that’s why we use the foil.

They are best served hot just as they are or with your favorite tomato sauce over spaghetti noodles. Or in a bun with cheese and marinara sauce or possibly just popped into your mouth directly from the baking sheet.

WHAT? They wouldn’t all fit in the container that I was going to put in the fridge!


Grain-free meatballs
Serves 4-6

1 lb (1/2 kilo) ground turkey
1 lb (1/2 kilo) ground beef
1/2 medium onion, finely chopped (about 1/2 cup)
4 cloves of garlic, finely minced
10 large button mushrooms, finely chopped (or about 2 cups)
1/3 cup parsley, chopped
Salt
Pepper
Steak seasoning, or your seasoning of choice

Preheat oven to 425°F/220°C. Line two baking sheets with foil.

Mix all ingredients together, form into golf ball-sized rounds, place on foil lined baking sheets and bake at 425°F/220°C for 20-30 minutes or until completely cooked through.


Serve over spaghetti with your favorite tomato sauce topped with parmesan cheese.


Creme Brulee

27 Feb

What is your favorite dessert? I am not much of a sweets person, but I really do love me some creme brulee. And I was shocked to find that I hadn’t yet shared my award-winning creme brulee recipe here.

creme brulee

A number of years ago, I was talking to my colleague and fellow foodie friend, Randy about the creme brulee they had at Kincaids and I told him that *I* could make a better creme brulee than they do. I think their proportion of custard to topping is not quite right and their topping still has crystallized sugar bits in it. He claimed that he could also make a better one than theirs and then challenged me to a creme brulee-off. So we, along with quite a few other colleagues, had a creme brulee contest at work. There was quite a bit of excitement around the contest and while Randy had some technical difficulties in making his creme brulee, the two of us came in first and second.

I took first place in the contest.

This is something that I remind Randy of every once in awhile…because he’s an amazing cook and would beat me at anything else, if I ever chose to challenge him. But just this one time, I won. While we were talking about the problems which led to him losing to me, he told me which recipe he uses. It’s this one right here – the same recipe I used. But his special secrets were to use vanilla bean and superfine sugar. And those just so happen to be the same two things I always make sure to use. So, while we worked independently of each other, we both used the exact same recipe with the exact same “secrets”. Take that as the highest endorsement for THE BEST creme brulee recipe.

ingredients

Here’s the reason for the superfine sugar – it dissolves very quickly and completely, making for a creamy dessert, with great texture and without any crystallization in the custard. It also melts very well when making the burnt sugar topping so you get the great contrast of a cool, creamy custard and the crunchy, brittle burnt topping.

And the vanilla bean imparts such a great flavor, better than any vanilla extract can provide. Plus you get the tiny black vanilla seeds at the bottom of your custard, which to me makes it all the better.

So here’s how you make it.

Combine the cream, sugar and the sliced and scraped vanilla bean and seeds in a medium saucepan over medium heat.

heating

While the cream is heating, separate your eggs

yolk

and whisk the yolks in a medium bowl or a glass measuring cup like I did here.

whisk

After the cream comes to a simmer, turn the burner to the lowest setting, put the lid on your pan and let the flavors infuse for 10 minutes. Then remove from the heat and strain the cream mixture.

straining

You’ll want to whisk in a little bit of the hot cream mixture to the egg mixture to temper the eggs or keep the eggs from immediately scrambling when you add them to the hot cream.  So pour a little bit of the cream into the eggs, mix well, and then add a little more.

tempering

When the egg mixture is warmed up enough, pour it all into the hot cream.

hot cream

Mix it well, then pour it into the ramekins. I like to use the large glass measuring cups for all of this mixing and whisking and such, because it makes it a whole lot easier in the end to pour the custard into the ramekins.

filling the ramekins

My ramekins have a little ledge near the top that I use as a guide for how full they should be.

Into the pre-heated oven they go for about 30-35 minutes.

dsc_0104

When they jiggle slightly, but are mostly firm, they are done. Remove them from the oven and let them cool until you can pick up the ramekins, then put them in the fridge to chill completely. Or if you live in Minnesota in February, you can put them outside on the patio for a few hours instead!

Now comes the fun part – pulling out the torch and burning the sugar!

sugar

Top the custard with about 1/2 a tablespoon of superfine sugar. You want to cover the entire top, but don’t want too deep of a layer of sugar.

sugar added

As you can see here, my super-fine sugar has clumped. And because I was too lazy to sift out the lumps, I left them in  and you’ll see that they all melted. But you could certainly be a better person than I and sift the sugar first.

Now, light your torch. Some of you may have those cute little hand-held creme brulee torches that have a gentle little flame…but I learned all about burning creme brulee in a restaurant where we had the industrial size torch, so I went to my local hardware store and got one of these for myself. And I love it!

the torch

Take your time and keep the flame about 2 inches away from the custard. You can leave your ramekin on the countertop and burn it that way, or you could live on the edge as I definitely do and pick it up and turn the custard while moving the flame around the top, gently melting and burning the sugar.

burning_1

burning_2

burning_3

burning_4

burnt

Once all the sugar has melted and is nice and dark, you’re done!

I like to burn all my creme brulee immediately before serving them. I think they taste best that way and it is also entertaining for the dinner guests. Sometimes, they want to learn to burn their own. Dinner AND a show!

Serve with fresh berries or tropical fruit like papaya or kiwi fruit.

served

Creme Brulee
Adapted from Epicurious
Serves 6

Ingredients

Custard
2 cups heavy whipping cream
1/2 cup sugar
1 vanilla bean, split lengthwise
5 large egg yolks

Topping
3 tablespoons sugar
Fresh berries or other fruit

Preparation

Make custard:
Preheat oven to 325°F/160°C. Place six 3/4-cup ramekins in 9”x13″ pan and add 2-3 cups of hot water to the pan. The water should come halfway up the side of the ramekins.

Use small knife to split the vanilla bean the long way and scrape out the seeds. Mix the cream, sugar, vanilla bean and seeds in a heavy medium saucepan. Stir over medium heat until the sugar dissolves and mixture just comes to a simmer. Cover the pan, reduce heat to very low and simmer gently for 10 minutes to infuse flavors. Then strain into a large measuring cup.

Whisk the yolks in a medium bowl until well blended. Gradually whisk in hot cream mixture just to blend. Pour that mixture back into the rest of the custard in the large measuring cup; pour equally among ramekins. Carefully transfer the pan to oven.

Bake custards until almost set in center when pans are gently shaken, about 30 – 35 minutes. Remove from oven and let cool 30 minutes. Chill at least 3 hours in refrigerator.

Make burnt sugar topping:
Sprinkle 1/2 tablespoon of superfine sugar evenly over each custard. Working with 1 custard at a time, hold blowtorch so that flame is 2 inches above surface. Direct flame so that sugar melts and browns, about 2 minutes.

You can refrigerate until custards are firm again but topping is still brittle, at least 2 hours but no longer than 4 hours so that topping doesn’t soften. Garnish creme brulee with fruit and serve.


Mayonnaise and Thousand Island Dressing

21 Feb

It’s nice to know what’s in your food, isn’t it? These days, it’s so important to read the labels on all the food you buy, as you never know what mystery ingredients might be hiding in your perfectly innocent food. And it’s especially important if you have any food sensitivities or allergies to watch out for.

There are also the times when you just want to make your own food. I grew up eating homemade mayonnaise, made by using the fresh eggs we had on our farm. So when I was on a cleansing diet recently and had to avoid canola oil as well as added sugars and various other things, I decided to make my own mayo. And it really is so easy.

mayo

Just a few simple — and NOT low fat– ingredients. You’ll see that it does take a fair amount of oil to make mayonnaise.

ingredients

The original recipe I used called for part sunflower oil and part olive oil. When making mine, I use just olive oil, making sure to use the extra light variety rather than extra virgin to avoid adding a strong olive flavor to the mayo.

Separate the eggs and use only the yolks for this. You can save the whites to make some meringues or Pavlova for dessert- yum!

Add the ingredients to food processor or blender.

ingredients

When picking whether you will use a food processor or blender to make this, keep in mind that you will have to drizzle in the oil slowly as the machine is running, so make sure you’re using something that allows you to do that easily. I have a Ninja blender with some of the small cups that make it impossible to actively add ingredients while the mixture is processing.

I like my food processor for this, (this is the one I have) because the food pusher that goes into the feed tube has two tiny little holes at the bottom of it, so I can slowly add the oil very easily by just pouring it into the pusher itself and the oil very slowly dispenses itself through those little holes.

Start slowly drizzling the oil while the machine is whirring, the mixture should start firming up quickly, then you can add the rest of oil more quickly. I add the first 1/4 cup very slowly until it’s emulsified, then add the rest of it right into the pusher and it slowly drizzles into the food processor.

self dispensing

Here you can see it self-dispensing.

self dispensing

And then, voila!

dsc_0064

I use this mayonnaise for anything and everything I would normally make with Hellmann’s mayonnaise. We make potato salad with it, and I recently discovered a recipe for shrimp salad made with just a tablespoon of mayo and an avocado for a very creamy healthy salad. But for the most part, I use it to make Paul’s favorite: Thousand Island dressing! He love it so much that he regularly tells me I could feed him an old shoe, as long as it was drenched in this dressing.

Using my mayo (but you can use purchased mayo just as  easily), I just add a few more ingredients to make a really tasty salad dressing that is also good on sandwiches, burgers, as a vegetable dip and even on old shoe leather.

TI dressing

And of course, I forgot to include the honey in this first shot!

raw honey

This was some beautiful raw honey I picked up in Asheville, NC over Christmas time and it’s a great addition.

Asheville honey

It certainly doesn’t hurt that it’s in such a pretty bottle either.

And the ever important ketchup – Heinz brand only. Accept no substitutes.

Heinz

We (and by “we”, I mean my husband Paul) have very strong feelings about ketchup, how we must always have enough of it in our house and how Heinz is the only acceptable brand of ketchup allowed. In fact, our first argument as a couple was about ketchup. Who knew condiments could evoke such strong feelings!

So add your Heinz ketchup and all the rest of your ingredients together and mix.

added ingredients

mixed

It is super easy to make. It’s got a little sweetness from the honey and ketchup, a little tanginess from the vinegar and chopped pickles as well as crunch from the pickles and onion.

Keep it in a jar in the fridge for all your salad needs.

PS. I made a double recipe here because we are having people over for dinner and because we love it so much that it will be gone quickly, so your batch from the recipe below will be a little smaller than this.


Mayonnaise
Yield: 2 1/2 cups

3 egg yolks, you can use pasteurized for added safety
2 tablespoons lemon juice
2 tablespoons apple cider vinegar
1/2 teaspoon salt
2 1/4 cup light olive oil

In a food processor bowl fitted with a metal blade, place the egg yolks, lemon juice, apple cider vinegar and salt. Turn the food processor on and blend well.

While the food processor is running, add 1/4 cup of oil very slowly through the feed chute until mixture emulsifies and begins to thicken, then pour in the rest of the oil in a steady stream.

Scrape down the sides of the bowl and mix the mayonnaise well.

You can store the mayonnaise in a glass jar in the fridge for about a week. Or make Thousand Island dressing.


Thousand Island Dressing
Adapted from Mommypotamus
Yield: 1 1/2 cups

1 cup mayonnaise
2 tablespoons ketchup
1 tablespoon apple cider vinegar
2 teaspoons honey
2 tablespoons pickles, finely chopped
2 tablespoons onion, finely chopped
1/2 teaspoon salt
1/2 teaspoon pepper

Combine all ingredients in a bowl. Taste and add more salt, pepper or vinegar if needed.


Sheet pan chicken

22 Jan

Cooking seems to be equal parts high art and necessary chore. Sometimes I would be perfectly content to putter around the kitchen all day long. Other times, I just want to toss something in the oven and just forget about it.

dinner is served

This dish would be perfect for those easy dinner days. You literally toss together whatever sounds good or whatever you have in your fridge, put some chicken thighs on top of it all and toss it in the oven. And you pull out the most delicious, nutritious dinner you could imagine!

nutritious dinner

This is not so much a recipe, but more of a guideline for a delicious meal. This is how I make mine…you can use other vegetables that you prefer, making sure to choose ones that roast well like root vegetables. You can also swap out the protein; to keep it simple, select something that roasts in the same time as the vegetables, such as pork chops or sausages. Fish would also work here, but you’d have to roast the vegetables for a while on their own before adding the fish for a shorter amount of roasting time. Half the fun is experimenting and making this dish your own – let your imagination run wild!!

So first, I cut up the vegetables I’m going to use.

raw vegetables

Some of my favorites are onions, potatoes, carrots, mushrooms, cauliflower and broccoli. So let’s start with those, cut up into bite sized pieces. And since I still have some rutabaga left over from the pasties, I’ll chop that up and add it to the mix. Along with a buttercup squash that I’ve had around for quite a while.

vegetables in bag

I cut them all up and place them into a plastic bag, drizzle with olive oil, add crushed garlic, salt and pepper and any other seasonings that you like and toss together to coat all the vegetables completely and evenly with the oil and seasonings. If you have any fresh rosemary or fresh thyme, add them to this mix. They add quite a nice flavor to the dish.

Then pour all the vegetables onto a heavy baking sheet pan.

vegetables on pan

Go ahead and dry the chicken thighs. I love to use chicken thighs with the skin on and bone in because the meat is so tender and flavorful and never dries out. And the skin crisps up so nicely!

You could season the chicken with salt, pepper, paprika and garlic powder or go nuts and use jerk seasoning or garam masala or curry powder. Other seasonings that are fantastic are anything by Chef Earl, a local fixture at the St Paul farmers market. Every time I make this dish, I use something different to season the chicken and I have yet to find a seasoning that I don’t like here. Today, I used a little Arisco, some paprika that my brother brought me from his trip to Hungary and some fresh cracked pepper.

Place the chicken thighs atop the vegetables and place into preheated oven for 45 minutes.

chicken ready for oven

Check the vegetables at 45 minutes and if they don’t seem done, leave them in another 15 minutes. Sometimes, I like to have the vegetables nice and browned, other times just having them be soft and cooked all the way through is good. You can check the potatoes and carrots for doneness by sticking a fork in them. If they are soft enough, the fork will  slide right in. If they are still hard, roast them for longer.

I’ve never had any issues with the chicken not being cooked all the way through, but if that’s a concern for  you, put a meat thermometer into the largest piece of the chicken and make sure it measures at least 165F/74C.

Look at the crispy skin on this piece!

crispy skin

Sheet pan chicken

Ingredients:

6 skin-on, bone-in chicken thighs
1 bunch of broccoli, broken into florets
1/2 head of cauliflower, broken into florets
1 8oz package of mushrooms, halved
1 pound of baby red potatoes, chopped in large pieces
4-6 medium sized carrots, peeled and chopped in large pieces
1 onion, chopped in large pieces
1/2 rutabaga, peeled and chopped in large pieces
1/2 buttercup squash, peeled and chopped in large pieces
4 garlic cloves, pressed
2-3 tablespoons of seasoning
2-3 tablespoons of olive oil
cracked pepper
salt
2 sprigs of fresh rosemary or fresh thyme

Preheat oven to 425F/220C.

Peel and chop the vegetables. Make the harder, longer cooking vegetables slightly smaller and make the softer, faster cooking vegetables larger. Place in large plastic bag or large bowl, drizzle with olive oil, add seasoning, pressed garlic and salt and pepper to taste and toss well to coat all the vegetables evenly. Add fresh rosemary or thyme sprigs.

Pour onto heavy baking sheet pan.

Dry chicken thighs well with paper towels. Rub the thighs really well with seasoning of  choice. Place atop the vegetables on the sheet pan.

Roast for 45 minutes, then check vegetables and chicken for doneness. If not done, return to oven for another 15 minutes or until done.

You can easily double the quantity of ingredients and make two pans at the same time. That way you’ll have lunches for the rest of the week. You’re welcome!

There are lots of variations on this dish here and here and here. Enjoy!


Pasties, Iron Range-style

16 Jan

Quite a bit has happened since I last posted here. I’ve met and married a wonderful man named Paul and we will be celebrating our 2nd wedding anniversary this coming April.

2february

Paul is from a part of northern Minnesota called the Iron Range because of it’s rich iron deposits and many iron mines. I’ve learned so very much about the Ranger culture and cuisine, of which the pasty is one of the most beloved parts. Oh, and it is “pasty” (rhymes with “nasty”) as in a Cornish pasty, not the inappropriate stripper wear or the bland color that my skin turns after a long Minnesotan winter.

Paul loves his pasties, especially the ones made by church basement ladies for their yearly fundraiser. So I set out to try to make pasties, using his family recipe and trying to make it the traditional way…before attempting to add my twist to it (you know that’s going to happen, of course!). I made these twice, once on my own using the family recipe and the second time I had Pam, my sister-in-law, show me the tried and true way.

1a_pam-recipe

The crust is a simple flaky pastry crust. If you’re a pie maker, you’re quite familiar with the process. If you aren’t a pie maker (yet), here’s how you do it.

Measure out the dry ingredients in a large bowl, then add the shortening – we used butter-flavored Crisco and lard, but any brand of shortening would work.

2_pam-cutting-dough

Then begin cutting the fat into the flour. Using a pastry cutter is vastly easier than using two knives, but if you don’t have a pastry cutter, just use two sharp knives to cut up the shortening and help incorporate it into the flour.

When the shortening has been fully incorporated into the flour and is a bit grainy, then add the cold water and combine.

3_add-water

We kneaded the ball of dough briefly, just to make sure it was all combined

4_pam-mix

6_kneaded-dough

divided it up into 8 parts, wrapped each part in plastic wrap and left them to rest on the counter for 20 minutes.

8_wrap-in-plastic

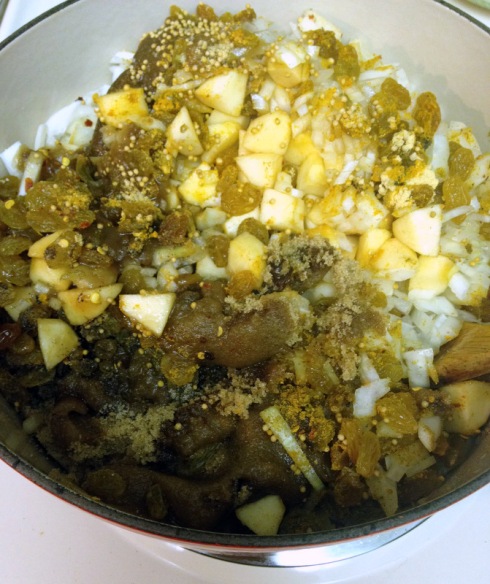
In the meantime, we peeled and chopped up the filling ingredients–onions, carrots, rutabagas and potatoes.

9a_ingredients

After peeling and chopping, we combined all the vegetables in a large bowl and seasoned them with salt and pepper.

10_mix-veggies

I don’t recommend doing as we did in our first attempt – we tried to speed things up by purchasing a bag of shredded carrots, however, the carrots poked out through the dough when we assembled them. Lesson learned – just take the extra 5 minutes and peel and dice actual carrots.

After the 20 minute waiting period for the crust was up, we rolled out each of the dough balls

11_pam-rolling

and we began to assemble them. About a cup and a half of the seasoned vegetables, about a half cup of ground beef (approximately 1/4 pound) and a pat of butter went onto one side of the rolled out dough.

14_pam-butter

The first ones we made could have held a little more filling under the dough, so on our second attempt, we filled them a little fuller.

13_pam-assemble

Then we brushed the edges of the dough around the filling with water and pulled the other half of the dough over the filling

15_pam-crust


15_pam-pasty

and pinched or rolled the crust around on itself. You want to seal in all the juices, so crimp or roll the dough over and around the filling. You can also crimp it with the tines of a fork.

16_on-baking-sheet

Then place on a baking sheet covered with a sheet of parchment paper and poke some vent holes in the top with a fork.

Pasties on pan

When you have a pan full of completely assembled pasties, placed about an inch apart in a baking sheet pan, they can go into a 350F/180C oven for 1 hour.

18_pastie-on-placemat

The pasties are ready!

The ones you don’t eat right out of the oven should be cooled fully, then wrapped in aluminum foil and put in a freezer bag and frozen for up to 6 months. You can reheat directly from frozen by putting them directly into a 350F/180C oven for 90 min. Keep the foil on it for the first hour, then open the foil to allow the crust to crisp up for another half hour.

19_lets-eat

Traditionally, an Iron Range pasty is served with Heinz brand ketchup (is there any other??). Other options are gravy or other sauces as desired…but not if you’re a Ranger.


Pasty

Crust:
4 3/4 cup all-purpose flour
1 teaspoon salt
1 1/3 cup lard or butter flavored Crisco (I use 2/3 cup lard and 2/3 cup butter flavored Crisco)
3/4 cup cold water


Filling:
5-6 medium-sized potatoes, peeled and cubed
3-4 large carrots, peeled and cubed
1 onion, chopped
1/2 rutabaga, peeled and cubed
2 pounds ground beef (raw)
salt & pepper
4 tablespoons of butter


Place measured flour and salt in medium bowl, add shortening/lard and cut together with pastry cutter until the mixture is grainy and the fat has mostly been incorporated into the flour. Then add cold water all at once and mix, kneading with your hands until it becomes a smooth dough.

Then divide dough into eight pieces, wrapping each individual ball with plastic wrap and let rest on the counter for at least 20 minutes.

While the dough is resting, peel and dice the potatoes, carrots and rutabaga and chop the onion, combine in a large bowl and season with salt and pepper.

Preheat oven to 350F/180C.

Roll out each individual ball of dough into about a 12-14 inch oval, making sure to roll the crust pretty thin.

Then place about 1 cup of the vegetables in one end of the oval, 1/4 cup of the beef, crumbled over the top, then another 1/2 cup of vegetables and the remaining 1/4 cup of beef crumbled, topped with a pat (about 1/2 tablespoon) of butter. Feel free to squeeze the filling together to compact it so you don’t have vegetables spread all over the dough.

Using a small bowl of water, rub some of the water around the dough at the edge of the filling to help glue your dough together.

Then pull the dough up and over the filling, doing your best to remove air pockets and seal the top crust to the bottom where you spread the water. Then starting on one end, start crimping or rolling the crust over itself to seal the edges. You can use a fork to seal the crust, if you like, or just leave the crust thick and rolled.

Prick the top of the crust with a fork a few times to vent the pasty.

Then place prepared pasty on a baking sheet covered with a sheet of parchment paper. You should be able to fit three to four pasties on each pan.

Bake pasties for one hour and serve while hot with Heinz ketchup. Enjoy!


Allow pasties to cool fully on a cooling rack then wrap in aluminum foil and place in freezer bag and freeze up to six months. To reheat after frozen, place foil wrapped pasties on baking sheet in a 350F/180C oven for one hour, then open foil wrap and return pasties to oven for another half hour until fully heated and crusty.


Roasted Butternut Squash Soup with Curried Apple Chutney

23 Dec

Winter is in full bloom in Minnesota, although this dinner was cooked and eaten when it was still officially fall. My apologies for taking a full season to update this blog with a new post!

When the colder seasons make their appearance, I like nothing better than to turn on my oven and bask in the smells and warmth of baking warm comforting food and sharing it with friends.

Butternut Squash Soup

I got together with a few of my friends at the house of Kyle (the photographer of the professional looking photos on this post–thanks, Kyle!!), we had a lovely dinner and as always, fun conversation and a great time together.

We enjoyed the Bear’s Den (aka Kyle’s garage) and the great company. We had butternut squash soup with curried apple chutney (recipes posted below), potato leek soup with bacon jam (recipes will be posted at a later date), grilled cheese sandwiches, purple cabbage salad and brats with onion jam, topped off by apple crisp with ice cream and salted caramel sauce (recipe taken from the caramel here with sea salt added).

Purple cabbage salad

Purple cabbage salad

Laura loosening the sauerkraut lid

Laura loosening the sauerkraut lid

John got it open!

John got it open!

Apple Crisp with ice cream and salted caramel sauce

Apple Crisp with ice cream and salted caramel sauce

But back to the recipes…butternut squash is a favorite of mine. It’s fantastic cut up and roasted, is delicious roasted and mashed as a side dish and it makes a beautifully creamy soup. As a shortcut to prevent cutting off your own extremities, roast the squash first, then simply scoop the softened flesh out of peel, rather than struggling with cutting and peeling the slippery, solid whole squash.

Butternut Squash roasted

Cut the squash in half, scoop out the seeds, brush with melted butter, then salt and pepper and pop right into the oven.

onion and apple

While the squash is roasting, finely chop an onion and an apple (aren’t they just so pretty?)

apple and onion

Saute the chopped onions and apple along with some sliced fresh sage and salt and pepper in a large pan over medium heat.

Butternut Squash Soup 027

Once the squash is soft and fully roasted, scoop it out of the peel and add it to the soup pot along with the chicken stock and water and let it simmer.

Butternut Squash Soup 038

Once everything is soft and well cooked, blend it well. You can put it in your blender in batches – carefully so you don’t burn yourself or blow the top off your blender – or with an immersion/hand blender. I love my immersion blender as it makes tasks like this so easy! Mine has a plastic blender base, so I can use it with my enamel cookware without fear of damage to the pots.

Butternut Squash Soup 048

I served this soup with curried apple chutney (the one in the middle), which was a snap to mix up and let cook for a few hours on the back of the stove.

Onion Jam, Curried Apple Chutney and Bacon Jam

Onion Jam, Curried Apple Chutney and Bacon Jam

Curried Apple Chutney 006

Just add all the ingredients to the pan and cook. Really. It’s that easy.

Curried Apple Chutney 002

1-Curried Apple Chutney 013

Cook until the apples are soft and it’s all cooked into even more of a browny-beige color (if that is even possible).

1-Curried Apple Chutney 018

This recipe made three jars of this chutney and was an excellent addition to the soup.

1-Curried Apple Chutney 026

Roasted Butternut Squash Soup 
adapted from Chow

Ingredients
4 pounds whole butternut squash (about 2 medium), halved lengthwise and seeds removed
2 tablespoons unsalted butter (1/4 stick)
1 medium Granny Smith apple (about 8 ounces)
1/2 medium yellow onion
8 fresh sage leaves
2 1/2 cups low-sodium vegetable or chicken broth
2 1/2 cups water
1 1/2 teaspoons kosher salt, plus more as needed
1/4 teaspoon freshly ground black pepper, plus more as needed
1/3 cup heavy cream

Instructions
Heat the oven to 425°F/220°C and arrange a rack in the middle.

Line a baking sheet with aluminum foil. Place the squash pieces cut-side up on the baking sheet. Melt 1 tablespoon of the butter and brush all of it over the tops and insides of the squash halves. Season generously with salt and pepper. Roast until knife tender, about 50 minutes to 1 hour.

Meanwhile, peel, core, and cut the apple into medium dice. Cut the onion into medium dice. Melt the remaining tablespoon of butter in a large saucepan or Dutch oven over medium heat. Add the apple, onion, and sage, season with salt and pepper, and cook, stirring occasionally, until softened, about 7 minutes. Remove the pan from the heat and set aside.

When the squash is ready, set the baking sheet on a wire rack until the squash is cool enough to handle. Using a large spoon, scoop the flesh into the saucepan with the sautéed apples and onions; discard the skins.

Add the broth, water, and measured salt and pepper, stir to combine, and bring to a boil over medium-high heat. Reduce the heat to medium low and simmer, stirring occasionally and breaking up any large pieces of squash, until the flavors meld, about 15 minutes. Remove the pan from the heat and stir in the cream.

Using a blender, purée the soup in batches until smooth, removing the small cap (the pour lid) from the blender lid and covering the space with a kitchen towel (this allows steam to escape and prevents the blender lid from popping off). Alternatively, use an immersion blender. Taste and season with salt and pepper as needed.

Curried Apple Chutney
recipe from West Coast Mama – adapted from the Well Preserved Cookbook

Ingredients
9 cups peeled, chopped and diced apple
2 cups finely chopped onion
2 cups golden raisins
2 cups brown sugar
1 1/2 cups cider vinegar
1 tablespoon mustard seeds
1 1/2 teaspoon salt
1 teaspoon dried chili flakes
1 teaspoon curry powder
1/2 teaspoon each of ground turmeric, cumin, coriander, cardamom and ginger

Instructions
Combine all the ingredients in a pot. Bring to a boil over medium-high heat, stirring occasionally. Reduce heat to medium and simmer for 1 to 1 1/2 hours or until thickened, stirring often. Stir almost constantly during the last 15 to 20 minutes of cooking time to prevent scorching.

Remove from heat. Ladle into jars and store in the fridge for up to 30 days. If you wish to be able to preserve them outside the refrigerator, you will need to follow the instructions below and learn about canning here.

If canning or preserving, then prepare the preserving jars.
Ladle the chutney into hot, sterilized jar leaving 1/2 inch head space. Wipe rims clean. Seal and process jars.

Quinoa Bowl

13 Oct

Quinoa bowl

During my recent birthday trip to visit my friend Karen, I was introduced to my new favorite dish, the Quinoa Bowl. Seriously, it’s so versatile and delicious and healthy and readily available. You can make it for lunch as a salad with what you have in your fridge. Or you can fancy it up and add some beautifully seasonal ingredients and make a completely different dish for a larger more satisfying meal.

ingredients

My version is a late summer/early autumn quinoa bowl. Here in Minnesota, everyone has zucchini (also called courgette) to spare, either from their garden or from the farmers market or even the grocery store. I can usually score a few from coworkers who have so many that they’ve run out of things to do with them and are so very happy to hand them out. They were first on the list.

zucchini

Butternut squash is a lovely ingredient that pairs with so many great fall flavors, which made it a slam dunk for this dish. Since it goes especially well with sage, I tossed the chopped up squash with sage, olive oil, salt and pepper and put it in the oven to roast.

butternut cubed

You have to be careful with cutting up the butternut squash, as you might risk life and limb. If you peel the skin first with a sturdy potato peeler, then the flesh is a whole lot more manageable.

peeling butternut

Because of my upbringing in Brazil, I have a hard time cooking meat without marinating it first. A simple marinade adds so much flavor to meat. For this chicken, I tossed the breast pieces with white wine vinegar, olive oil, salt, pepper, chopped sage and chopped garlic. It’s super easy in a zip top plastic bag – you toss everything in there, zip the top, mix it up a bit, let it sit for 30 minutes or so, then remove the chicken to the grill and toss the bag. No muss, no fuss. (not pretty, but also not messy)

chicken in a bag

While the squash was roasting and the chicken marinating, I began the quinoa. Rinse it first, then add to a saucepan – 1 cup of quinoa to 2 cups of water, a dash of salt and bring to a boil. (here are fool-proof cooking instructions from the folks at The Kitchn)

rinsing

The chicken and zucchini went on to the grill.

grilled chicken 2

I had half an onion in my fridge, so I drizzled that with olive oil and tossed those slices on the grill too. Have you ever had grilled onion? Oh boy! It’s a happy day when you can grill onions. They are sweet, smoky and a bit crunchy still. Yum!

grilling 2

If you look closely, you can see one of the perils of grilling veggies – they slip right through the grates and out of reach…sadly.

This was also a great excuse to try my new balsamic vinegar and olive oil, a gift from my dear friend Eddie, they are from a local Minneapolis store called Vinaigrette. They were amazing! The balsamic is so sweet, think and mellow that you could drink it straight from the bottle. Thanks Eddie!!

oil & balsamic

I poured a glug of balsamic in a bowl, added olive oil, a blurb of Dijon mustard, fresh ground pepper and salt with a few drops of water and whisked it until well combined.

vinaigrette

Now assemble. Quinoa on the bottom, then top with all the rest of the goodies – I used the roasted and grilled veggies, dried cranberries, chopped pecans, herbed goat cheese and grilled chicken, drizzled with the vinaigrette and garnished with fresh sage.

Quinoa bowl

Voila! My new favorite dish.

helping cats

Anddddddd proof that I’m a certified crazy cat lady! (Never fear, both Hattie and Mabel were swooped off the table 30 seconds after I took this photo)

Quinoa Bowl

Cooked quinoa (how to cook quinoa)
Grilled chicken
Roasted butternut squash
Grilled vegetables (zucchini, onions, or any others)
Dried cranberries
Pecans
Goat cheese

Vinaigrette
1 tablespoon balsamic vinegar
3 tablespoons olive oil
½ teaspoon Dijon mustard
Salt
Pepper
1 teaspoon water

Whisk all the above ingredients together in a bowl until they are all well combined. Drizzle over the top of your bowl for a lively punch of flavor.

Bonus dish: A few days later, I cooked a whole new meal with the leftovers – I chopped up chicken, some of the veggies, some kale and the quinoa, sauteed them until crispy and topped with a boiled egg.

quinoa hash 1

Voila! Quinoa hash!

Quinoa hash

Carrot-Zucchini Bread

19 Aug

Thank you Alice for the amazing tip on the easiest apple pie ever! I now have a packet of puff pastry in my freezer for those last minute dessert needs.

So we’ve explored quite a few fruit desserts recently, but how about a sweet vegetable bread?

1-Carrot Zucchini Bread with Ginger 055

Being the end of summer here in Minnesota everyone has an overabundance of zucchini from their gardens, so why not make bread with it?! This recipe from Leite’s Culinaria intrigued me because of the addition of carrots and candied ginger to a basic zucchini bread recipe. Yum!

Carrots & Zucchini

I grated the zucchini and carrots in my greatly loved, ancient but usable food processor.

grate!

They can very easily be grated with a hand grater as well. Just take care with your knuckles!

1-Carrot Zucchini Bread with Ginger 016

See, so pretty!

My friend and sous chef Karen measured out all the dry ingredients.

dry ingredients

We got to try the candied ginger, which was delicious and quite expensive. After a bit of poking around, I think I might try to make my own as it doesn’t look too difficult to do. David Lebovitz has a lovely recipe that I mean to try shortly.

candied ginger

I mixed the eggs in the mixer until they were frothy,

eggs

then added sugar, oil and vanilla. Once they were all well combined

eggs and sugar

I tossed in the shredded veggies and mixed those in as well.

1-Carrot Zucchini Bread with Ginger 039

At that point the dry ingredients were tossed in all at once and stirred together just until combined.

add dry to wet

While I was mixing and combining, Karen had gotten a loaf pan and a muffin pan all ready for the batter by greasing them with spray oil.

1-Carrot Zucchini Bread with Ginger 048

We filled the baking pans and into the oven they went.

symmetrical

Because the recipe gave baking directions for the loaf but not the muffins, I improvised and checked the muffins at 30 mins. They were perfectly done.

funfetti

They looked like party muffins with the green and orange flecks and then every once in a while there was a spicy chunk of candied ginger to liven things up.

The loaf baked for a full hour at 325°F/162°C.

Carrot Zucchini Bread with Ginger loaf

It was quite delicious plain, but slathered with butter is even better.

Carrot Zucchini Bread with Ginger

I experimented with the zucchini loaf and some sharp cheddar in trying to make a grilled cheese sandwich. It was quite tasty, but the slices of the bread should be very thin to allow the cheese to melt before the bread starts to burn.

Carrot Zucchini Bread grilled cheese

CARROT-ZUCCHINI BREAD RECIPE
via Leite’s Culinaria
Makes two loaves or 24 muffins

INGREDIENTS
Nonstick cooking spray
3 cups sifted unbleached all-purpose flour
1 1/2 teaspoons ground ginger
1 1/2 teaspoons ground cinnamon
1 teaspoon baking soda
1/4 teaspoon baking powder
1 teaspoon kosher salt
1/2 cup minced candied ginger
3 large eggs
1 cup canola oil
1 3/4 cups sugar
2 teaspoons vanilla extract
1 cup carrots, peeled and grated
1 cup zucchini, grated

DIRECTIONS
1. Preheat the oven to 325°F (162°C). Coat two loaf pans with nonstick cooking spray or butter. You could also make them in two muffin tins.
2. Sift together the flour, ginger, cinnamon, baking soda, and baking powder in a medium bowl. Stir in the salt and candied ginger.
3. In a large bowl, whisk the eggs until light and foamy. Add the canola oil, sugar, and vanilla, whisking vigorously until the sugar dissolves. Whisk in the carrots and zucchini.
4. Add the flour mixture to the egg mixture all at once and stir with a wooden spoon just until blended. Divide the batter evenly between the pans.
5. Bake until the zucchini bread is well risen and firm to the touch and a toothpick inserted in the center comes out clean, about 1 hour for a loaf pan or 30 minutes for muffin tins. Let the zucchini bread cool in the pans on a rack for 10 minutes, then invert them and finish cooling them right side up on the rack. Of course, a thin slice for the cook while the loaves are warm isn’t out of the question.

Easiest Apple ‘Pie’

5 Aug

plated1

You know those nights where you think… oh mannnnnnnn.. I wish I had apple pie? (Especially after being tormented by DELICIOUS CAKE RECIPES. Thanks, B!)

Well, here you go, this is the world’s EASIEST substitute. We often have puff pastry sheets languishing in the freezer after some savoury pie, like the leek and chicken pie we made last week. Usually there are offcut pieces that you know will be difficult to use up.

All you need is an apple, a little butter, sugar, alongside some puff pastry offcuts, and you can make this pie like deliciousness.

ingredients

I pre-heated the oven, and then started by peeling, quartering, coring and slicing an apple. I went for a Granny Smith this time, but I am pretty sure I have used every type of apple over the years. Slice them a few milimetres thick… no idea what that is in inches, but thin-ish.
peelslice

I then started to assemble them. Lay your puff rectangles on some baking paper on a baking tray. Mine were around 2 inches by 5 inches, but you can have any offcut size and adapt your topping to suit.

Fan out the apple, this is half an apple on each piece of pastry. Then sprinkle with a scant teaspoon of sugar, and dot with a teaspoon and a half (or so) of butter.

fan_applesugar_butter

Then into the oven…. I baked these for 30 minutes, then while they were still warm, served with ice cream. Cream would work well also.

plated2

Voila… so simple. Also kind of impressive for so little work!

______________________________________________________

Easiest Apple ‘Pie’
ingredients (for two)

Two pieces of prepared puff pastry (around 2 inches by 5 inches)
1 apple, peeled, quartered, cored and sliced thinly
2 scant teaspoons of white sugar
3 teaspoons of butter

Preheat oven to 175C/350F.

Line a baking tray with baking paper and assemble the ‘pies’. Fan half an apple the length of each pastry base. Sprinkle the sugar over the apple, and then dot the butter the length of the apple.

Bake until pastry edges are golden, around thirty minutes.

Serve with cream or ice cream.

______________________________________________________

Chocolate Strawberry Nutella Cake

15 Jul

Mmmmmm, cake is a good direction in which to take this series of blog posts. I’m glad Alice posted that recipe for the Lemon Syrup Cake…I think she has just introduced me to my new favorite cake.

On the subject of rich cakes, how about this one??

Image

I spotted this cake on Pioneer Woman’s blog. I follow her on Facebook and she posted such a tantalizing photo that looked so interesting that I was compelled to try it. I’ve made it a few times now. That’s how you know it’s good.

The first time I made it, my friend Karen and I didn’t want to use strawberries, so we went ahead and swapped them out for cherries. It was a really good choice.

ramekins_cherry

Also, I thought it might be interesting to mix it up and make individual desserts, so we baked those in ramekins. Also a good choice as the cakes were a little gooey in the middle and altogether quite delicious.

The next time I made it was for my little friend’s birthday.

Image

I used strawberries as the original recipe suggests.

We melted the butter, added the cocoa and boiling water

Image

Isn’t that pretty??

Mixed together the dry ingredients, then poured the melted chocolate into the bowl while mixing it on low.

Image

Word to the wise…do as I say and not as I do. I spilled a significant amount of the hot chocolate mixture while attempting to pour it straight from the pan into the mixer.

After mixing together the liquid ingredients,

Image

pour it into the chocolate mixture and voila!

Image

Prepare the cake pans by lining them with rounds of baking paper and spraying them with non-stick cooking spray. Then pour the batter into the prepared pans and bake.

Image

Alternately, grease some ramekins and fill them 3/4 full of batter. This recipe would make at least 12 ramekins full of cake.

Image

Bake the cakes. When they are finished, let them cool before turning the large cake rounds out onto a cooling rack.

Image

Peel the parchment paper off the back of the cake before cooling on the rack.

The individual cakes don’t need turning out. You can build the cake right in the cute little baking dish.

Image

While the cakes are cooling, whisk up some whipping cream and confectioners sugar in the mixer.

Image

The whipped cream was quite a hit with the helpers.

Image

Image

Image


Here’s the fun part – building the cakes!

building the cake

First a layer of Nutella on the cake

Nutella

Topped with a nice dollop of whipped cream

whipped cream

Then add the berries

strawberries

Add the second cake and repeat.

For the individual cakes it’s even easier. Keep the cakes in their baking dishes, add the layer of Nutella

ramekins_Nutella

ramekins_covered

Yum!

Top with a generous dollop of whipped cream and the berries.

ramekins_final

Done! Now enjoy!

Chocolate Strawberry Nutella Cake
by the Pioneer Woman

Ingredients

FOR THE CAKE:
2 sticks butter
4 tablespoons cocoa powder
1 cup boiling water
2 cups flour
2 cups sugar
1/4 teaspoon salt
1/2 cup buttermilk
2 eggs
1 teaspoon baking soda
1 teaspoon vanilla
1-1/2 cup Nutella

FOR THE FRUIT:
2 pints strawberries, hulled and sliced
1/4 cup sugar
1 teaspoon vanilla

FOR THE WHIPPED CREAM:
2 cups heavy cream
1/2 cup powdered sugar

Method:
Preheat the oven to 350 degrees. Line 2 round baking pans with parchment, then spray the parchment with baking spray.
In a medium saucepan, melt the butter. Add the cocoa and stir it until smooth. Pour in the boiling water, let the mixture bubble up for 20 seconds or so, then turn it off and set it aside.
In a measuring pitcher or bowl, mix together the buttermilk, baking soda, eggs, and vanilla. Set aside.
In a large mixing bowl, mix together the sugar, flour, and salt. Stir in the hot chocolate mixture, stirring gently until it’s halfway combined and less hot. Pour in the buttermilk mixture and continue stirring gently until the batter is all combined.
Pour the batter into the pans and bake them for 17-20 minute, until they’re just set. Remove them from the pans and set them aside to cool completely.
B’s option: For ramekin cakes, spray the ramekins with baking spray and fill them 3/4 full of batter. Bake for 15 minutes and check with a toothpick to see if the cake is fully baked.
Meanwhile, prepare the strawberries by stirring them with the sugar and the vanilla. Let them macerate for 15 minutes, then drain off the excess juice.
B’s option: I used the strawberries without any vanilla or sugar, however, I did macerate the cherries for that cake. The cherries would also be good soaked in an almond liqueur for more a grown up treat.
Whip the cream with the powdered sugar.
To assemble, turn one layer upside down on a serving platter. Spread half the Nutella all over the surface. Spread on half the whipped cream and top with half the strawberries. Place the other layer upside down on top and repeat with the rest of the Nutella, whipped cream, and strawberries. Keep chilled until serving. Cut with a serrated knife!
B’s option: For the ramekin cakes, leave them in the baking dish, spread them with a layer of Nutella, top with a dollop of whipped cream, then the fruit. Serve individually, with a spoon.

Happy Birthday!

Happy Birthday, Cambria. I hope your wish came true!!