Tag Archives: gluten free

Grain-free meatballs

16 Mar

Our spring has turned very unspring-like this week, with a few inches of snow and colder weather returning to remind us that we live in Minnesota. So what can one do but make hearty comfort food?

Hey, I’m fully on board with that.

We’ve been trying to stay away from wheat, which really does a number on my system. So I decided to try making meatballs without breadcrumbs. I also tried to make it as vegetable heavy as I could. Voila! It’s our new favorite dish to add to any sort of good meal. These meatballs stand on their own as a protein for any meal but really are quite delicious with a simple tomato sauce over whole wheat noodles or, in my case, spaghetti squash, for a fully wheat-free dinner.

I use half ground turkey and half ground beef. I’ve been meaning to experiment with adding in some spicy sausage as well. Maybe next time.

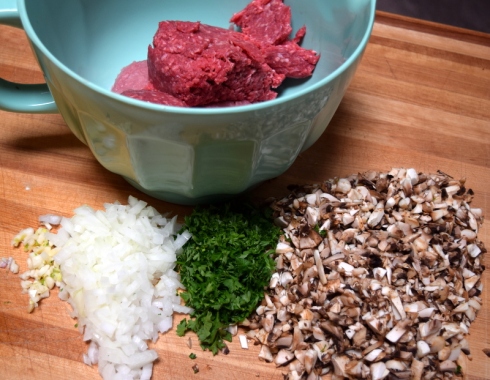
Finely chop some onion, garlic, parsley and mushrooms. Make sure the mushrooms get chopped very well.

I think the mushrooms really make the dish. They add quite a bit of moisture to the meatballs and keep them from being too heavy or dense.

Mix everything together and add the seasoning of your choice.
I always add Arisco, my favorite Brazilian seasoning, to everything. It’s perfect in here for seasoning the meat. But you can always just use salt and pepper or steak seasoning or even a good Italian seasoning. You get to make the choice on what flavor you prefer.

Don’t be afraid to get your hands in there…it’s easier to form the meatballs by hand anyway.

Line a couple of baking sheets with foil, then form golf ball-sized meatballs and plop the meatballs on the foil-lined pans.

You could make them really tiny to serve at a party. Or maybe you just like tiny food. There’s no judgement here! Just make sure you adjust the baking time.

Put the pans into a preheated 425°F/220°C oven for 20-30 minutes. You’ll notice that they release some liquid. No worries…that’s why we use the foil.

They are best served hot just as they are or with your favorite tomato sauce over spaghetti noodles. Or in a bun with cheese and marinara sauce or possibly just popped into your mouth directly from the baking sheet.

WHAT? They wouldn’t all fit in the container that I was going to put in the fridge!


Grain-free meatballs
Serves 4-6

1 lb (1/2 kilo) ground turkey
1 lb (1/2 kilo) ground beef
1/2 medium onion, finely chopped (about 1/2 cup)
4 cloves of garlic, finely minced
10 large button mushrooms, finely chopped (or about 2 cups)
1/3 cup parsley, chopped
Salt
Pepper
Steak seasoning, or your seasoning of choice

Preheat oven to 425°F/220°C. Line two baking sheets with foil.

Mix all ingredients together, form into golf ball-sized rounds, place on foil lined baking sheets and bake at 425°F/220°C for 20-30 minutes or until completely cooked through.


Serve over spaghetti with your favorite tomato sauce topped with parmesan cheese.


Quinoa Stuffed Squash Rings (Dinner Party – part 1)

27 Feb

Plated dinner

This past weekend I had a dinner party. It came about because my friend Christine just finished her kitchen remodel and currently has the best dinner party kitchen around with lots of work space, a beautiful long center island and quite a few places to set out food and drink! I wanted to cook in that nice kitchen and what better excuse for a dinner party than a lovely home, good food and great friends?

Terri, Jane, Christine, Jill/Gracie, B, Kate

Terri, Jane, Christine, Jill/Gracie, B, Kate

Olive and Kevin

Olive and Kevin

Christine, the hostess with the most-ess

Christine, the hostess with the most-ess

I also had the pleasure of working with Kyle Krohn who took the photos that I’m using on these two dinner party posts. He’s quite talented and is a great instructor. I plan to keep improving my own photography with his help.

The menu was a good solid winter dinner:

Pork Roast with Winter Fruits and Port Sauce (recipe to be featured in my next post)
Quinoa Stuffed Acorn Squash Rings
Smashed Potatoes
Roasted Carrots
Chopped Salad
Tiny Pies

The squash rings were a new dish for me. I’ve been cooking with quinoa quite a bit recently and have found that it’s a tasty good-for-you grain that is so adaptable to many different flavors. I like the tri-color variety that I get at Trader Joe’s.

This time I decided to make a quinoa stuffing for squash. This would be a great holiday dish for one of the many US holidays that involve squash, such as Thanksgiving dinner or Christmas dinner or any random dinner really. Cutting the squash into rings allowed me to make these individual portion sizes for a larger group.

Acorn squash

I cooked up the quinoa with chicken broth according to the package. It’s very similar to rice in that you use a 2:1 ratio of liquid to quinoa.

I rinsed one cup of quinoa first, then added it to a large stock pot with two cups of chicken broth and brought it to a boil.

At that point, I turned the heat down to low and covered the pan and let it cook for 15 minutes before removing it from the heat for another five minutes.

Quinoa

I chopped an onion, a red pepper and two tomatoes and sautéed them in a separate pan. When they were all softened, I added the cooked quinoa, some dried cranberries and slivered almonds and a splash of chicken broth, along with some salt, pepper and a pinch of dried sage.

Because I like stuffed squash but wanted individual servings, I cut the acorn squash into rings. Cut them, using a sharp knife and a lot of caution, as the last thing you want as part of your dinner party is a visit from the paramedics to stitch up your finger!

Squash slices

Cut the squash in one inch (2.5 cm) sized rings and remove the seeds.

Removing seeds from squash

Place the rings on a baking sheet covered in parchment paper and spoon the quinoa mixture in them.

Filling squash

Bake at 370 F/190 C for 30 minutes or until the squash is soft.

Remove carefully from baking sheet with a wide spatula and place directly on plates.

Dinner!

The side dishes were very simply done. I boiled baby potatoes until they could be easily pierced with a fork. After letting them cool, I smashed them with a glass, put them on a roasting sheet, drizzled them with a bit of melted butter and popped them in the hot oven until they were crispy – about 20 minutes.

For the carrots, I peeled them and cut them into 2-3 inch segments at an angle just to make them pretty. Then I tossed them with one tablespoon of olive oil in a large plastic bag to thoroughly cover them. Then they too went onto a baking sheet, were sprinkled with a large pinch of kosher salt and placed into the hot oven for about 20-25 minutes, until they had some caramelized bits on the bottoms. The carrots prepared this way were so good! They were like candy.

I’ll be back for my next post with part two of the dinner party to give you the delicious stuffed pork roast recipe.

Quinoa Stuffed Squash Rings
Serves 6-8

3 acorn squash (or any other squash that can be cut into rings)

1 cup quinoa
2 cups broth, chicken or vegetable
1/2 large onion, chopped
1 red pepper, chopped
2 Roma tomatoes, chopped
1/2 cup dried cranberries or other dried fruit
2 tablespoons slivered almonds
1 teaspoon dried sage
salt & pepper

Rinse the quinoa. Add to a medium saucepan with two cups of broth and bring to a boil over high heat. When it comes to a rolling boil, reduce the heat to low, cover the pan, let it cook for 15 minutes then remove from the heat, still covered for another five minutes.

As the quinoa is cooking, cut the squash into rings or slices and remove the seeds. Use a sharp knife and use a solid cutting board, as your knife could slip and your fingers will be in danger.

Place the cleaned out squash rings or slices onto a baking sheet covered in parchment or baking paper to keep the stuffing from sticking to the pan.

In another pan, saute the chopped onion in a tablespoon of oil until it becomes translucent.  Add the red pepper and tomatoes and let them soften for a few minutes. Then combine with the cooked quinoa, dried fruit and nuts and season with salt, pepper and sage to taste. If the mixture seems a little dry, add some broth a half cup at a time until it has achieved the consistency you would like.

Fill the squash rings generously with the stuffing. Bake at 375 F/190 C for 30 minutes or until the squash is soft.

Spiced Roasted Chickpeas

30 Jan

How good did Alice’s Chickpea Hash look last week?? I’ve resolved to keep a few cans of chickpeas in my pantry at all times just to be prepared in the event of a chickpea hash craving.

In the spirit of improving my diet steadily while still eating really good food, I was inspired to make a batch of these roasted chickpeas this week.

1-Spiced Roasted Chickpeas_in bowl

These are a nice change from the regular texture of beans, as they get nice and crunchy like snack nuts when roasted, but with all the fiber and protein of the beans. So you can snack without feeling like you’re cheating and eating junk food.

It’s an easy recipe that even the kids will love.

1-Spiced Roasted Chickpeas_in bowl w girls

…waiting impatiently to dig in!

First get your ingredients together.

1-Spiced Roasted Chickpeas_ingredients

I used an assortment of spices from my cupboard that gave it a bit of a Moroccan flavor. You can mix up this spice mix and maybe go with some chili powder or garlic salt…play with the flavors to find your favorite combination.

Place the chickpeas in a colander and rinse under running water for about 30 seconds to remove most of the goo from the can.

1-Spiced Roasted Chickpeas_rinsing4

Then pour them out onto paper towels and dry them off. I had some great help patting them dry.

1-Spiced Roasted Chickpeas_helpers2

Measure out your spices

1-Spiced Roasted Chickpeas_spices

Once your chickpeas are dry, pour them into a plastic bag with the spices and a drizzle of olive oil and shake until they are all well coated

1-Spiced Roasted Chickpeas_shaking

Pour onto a baking sheet

1-Spiced Roasted Chickpeas_on pan2

Then place in a 375°F/190°C pre-heated oven for 40-60 minutes depending on how crispy you’d like them to be. I wanted them very crispy, so I kept them in for the full hour.

1-Spiced Roasted Chickpeas_on pan roasted-001

Pour them into a bowl and let the snacking begin!

"I want THIS many!" June

“I want THIS many!” -June

Spiced Roasted Chickpeas
(inspired by this recipe and this one and this one too)

2 cans chickpeas (garbanzo beans)
1 tablespoon olive oil
1/2 – 1 teaspoon spice mix below
1/4 teaspoon sea salt

Spice Mix:
2 teaspoons ground cumin
1/2 teaspoon sweet paprika
1/2 teaspoon ground cinnamon
1/4 teaspoon ground ginger
1/8 teaspoon cayenne pepper

Preheat oven to 375°F/190°C.
Drain chickpeas into a colander and rinse well with cold water until no more foam appears. Let beans drain for 5-10 minutes, then pat dry with a cloth of paper towel if they still look wet. While beans drain, make spice mix. This is great on roasted veggies or chicken, so make the full amount and store in a glass jar.
When beans are well drained and dried, toss with olive oil, spice mix, and salt. Arrange in single layer on baking sheet. Roast 40-60 minutes, or until they are slightly browned and make a rattling sound when you shake the baking sheet.  Serve warm or let cool.

Caramelised Onions

8 Aug

I have never had Popovers, I’d never even heard of them before. I am intrigued by them now. How does that stunning shape form on top?

I am in Melbourne, hoping that one day the house we are building will be finished, and am being graciously hosted by my father and step-mum. B’s post made me think of many delicious tangents, rhubarb muffins, a friend suggested cheese blintzes, but this house is mostly a sugar free house, and one person is wheat free too. So if I am cooking up a storm, I want it to be something to share.

I have always found caramelised onions to be magic. You take a basic ingredient, onion, and with a little oil, and a whole lot of stirring over heat, it becomes this intense, sweet and versatile mess. The way I imagine popovers, it would taste great on them. It also works on a simple steak or a slice of bread and cheese. Tonight I am planning to toss it through some baked potato cubes and serve it alongside some pan-fried fish.

Often when I go to a restaurant and they say they have caramelised onions, I am disappointed as they aren’t caramelised to this same point of bliss. I really do recommend making them yourself sometime. They are quite a bit of work, only because of the stirring, but it pays to make them yourself for a flavour you don’t get elsewhere.

Here is what I started with… small onions, oil, rosemary and bay leaves.


The recipe I use is from this book, Stephanie Alexander’s famous The Cook’s Companion. She cleverly lists no times, as it really does depend on how high you have the heat. I seem to always have the heat a little too low to begin with, and turn it up as I go. This time I spent an hour and a half cooking.

First I peeled and chopped the onions… then put all of the ingredients in to a heavy bottomed pan, gave it a stir, and then put the lid on. Over medium heat I left them to cook for 15 minutes, stirring every few minutes until softened.

Then I took the lid off, and continued to cook. Stirring frequently, I cook and scraped the pan of the delicious pieces that stick a little, until the whole pan full had reduced down and was a ‘rich caramel brown’.  They reduce so dramatically, don’t be afraid as you cut up what seems like mounds and mounds of onion.

Like alchemy huh?

Sweet, without adding a touch of sugar, and the added bonus of the house smelling wonderful.

In theory, they last a few days in the fridge. Strangely enough, mine never seem to hang around much longer anyway.

Have you ever made them B? Where do they take you?

______________________________________________________

Caramelised Onions
Recipe by Stephanie Alexander, from The Cook’s Companion

Stephanie says: This is my favourite way to eat onion. You can add it to many other sandwiches or to pasta, or use it in frittatas, as a topping for a quick pizza, on a piece of grilled tuna, in a warm salad of chick peas or to add instant depth of flavour to a stew.

20 small or pickling onions, peeled
half cup olive oil
1 bay leaf
1 sprig rosemary

Quarter or slice onions. Tip all ingredients into a heavy-based frying pan over a moderate heat. (A non-stick pan also does a good job. Be careful to use a non-scratching implement for stirring.) Cover pan and cook for 15 minutes until the onion has begun to soften, stirring frequently. Remove cover and continue to cook, stirring, until the onion has started to turn a rich caramel brown. It doesn’t matter if sections look very dark – this adds flavour. The important thing is to stir frequently to prevent sticking. (If this looks likely, add an extra spoonful of oil. The onions can be drained of any excess oil before using.)

The onions and their oil keep well in a covered container in the refrigerator for several days. The oil is just as delicious as the onions!

______________________________________________________